Skills
exit the keyboard
- (void)touchesBegan:(NSSet<UITouch *> *)touches     withEvent:(UIEvent *)event {
    [self.view endEditing:YES];
}
Add Target to control component
[self.datePicker addTarget:self action:@selector(getInput:) forControlEvents:UIControlEventValueChanged];DatePicker
set frame after DatePickerStyle to gurantee datepicker in center
PickerView
Implement UIPickerViewDelegate & UIPickerViewDataSource in Interface
@interface ViewController()<UIPickerViewDelegate, UIPickerViewDataSource>
@end
functions
component = cols index
row = rows index
- cols number
-(NSInteger)numberOfComponentsInPickerView:
2. rows number
-(NSInteger)pickerView:(UIPickerView *)pickerView numberOfRowsInComponent:(NSInteger)component
3. title of every row
-(NSString *)pickerView:(UIPickerView *)pickerView titleForRow:(NSInteger)row forComponent:(NSInteger)component
4. when select each row
-(void)pickerView:(UIPickerView *)pickerView didSelectRow:(NSInteger)row inComponent:(NSInteger)component
set delegate
self.pickerView.delegate = self;
self.pickerView.dataSource = self;
ScrollView
Three Attributes
- contentSize - the size of scrolling content
- contentOffset - the offset between the pos with [0,0]
- contentInset - edge size
Important Delegate Methods
// use when scrolling
- (void)scrollViewDidScroll:(UIScrollView *)scrollView;

// use when zooming
- (void)scrollViewDidZoom:(UIScrollView *)scrollView API_AVAILABLE(ios(3.2));

// start draging
- (void)scrollViewWillBeginDragging:(UIScrollView *)scrollView;

// will end draging
- (void)scrollViewWillEndDragging:(UIScrollView *)scrollView withVelocity:(CGPoint)velocity targetContentOffset:(inout CGPoint *)targetContentOffset API_AVAILABLE(ios(5.0));

// end drag
- (void)scrollViewDidEndDragging:(UIScrollView *)scrollView willDecelerate:(BOOL)decelerate;

// start decelerating
- (void)scrollViewWillBeginDecelerating:(UIScrollView *)scrollView;

// end decelerating
- (void)scrollViewDidEndDecelerating:(UIScrollView *)scrollView;
Zoom related Method
// zoom component
- (UIView *)viewForZoomingInScrollView:(UIScrollView *)scrollView;
// start zooming
- (void)scrollViewWillBeginZooming:(UIScrollView *)scrollView withView:(UIView *)view;
// finish zooming
- (void)scrollViewDidEndZooming:(UIScrollView *)scrollView withView:(UIView *)view atScale:(CGFloat)scale;
option + mouse = finger gesture
Get bottom line of the most bottom component
CGRectGetMaxY(component.frame)
Example Carousel
#import "ViewController.h"
@interface ViewController()<UIScrollViewDelegate>
@property(strong, nonatomic) UIScrollView *scrollView;
@property(strong, nonatomic) UIPageControl *pageControl;
@end
@implementation ViewController
CGFloat width;
-(void)viewDidLoad {
[super viewDidLoad];
width = [[UIScreen mainScreen] bounds].size.width;
CGFloat height = [UIApplication sharedApplication].windows.firstObject.windowScene.statusBarManager.statusBarFrame.size.height;
self.scrollView = [[UIScrollView alloc] initWithFrame:CGRectMake(0, height, 414, 200)];
self.scrollView.delegate = self;
self.scrollView.backgroundColor = [UIColor blueColor];
for(int i = 0; i < 5; i++) {
UIImageView *imgView = [[UIImageView alloc] initWithFrame:CGRectMake(i*width, 0, width, 200)];
if (i%2 == 0) {
imgView.image = [UIImage imageNamed:@"1"];
} else {
imgView.image = [UIImage imageNamed:@"I-797C.jpeg"];
}
[self.scrollView addSubview:imgView];
}
self.scrollView.contentSize = CGSizeMake(5*width, 0);
self.scrollView.bounces = NO;
self.scrollView.showsHorizontalScrollIndicator = NO;
self.scrollView.pagingEnabled = YES;
self.pageControl = [[UIPageControl alloc] initWithFrame:CGRectMake(width/2 - 100, 190, 200, 20)];
self.pageControl.numberOfPages = 5;
self.pageControl.currentPage = 0;
self.pageControl.currentPageIndicatorTintColor = [UIColor whiteColor];
self.pageControl.pageIndicatorTintColor = [UIColor grayColor];
self.pageControl.backgroundStyle = 2;
//self.pageControl
[self.view addSubview:self.scrollView];
[self.view addSubview:self.pageControl];
}
- (void)scrollViewDidEndDecelerating:(UIScrollView *)scrollView {
CGFloat offset = self.scrollView.contentOffset.x;
self.pageControl.currentPage = offset / width;
}
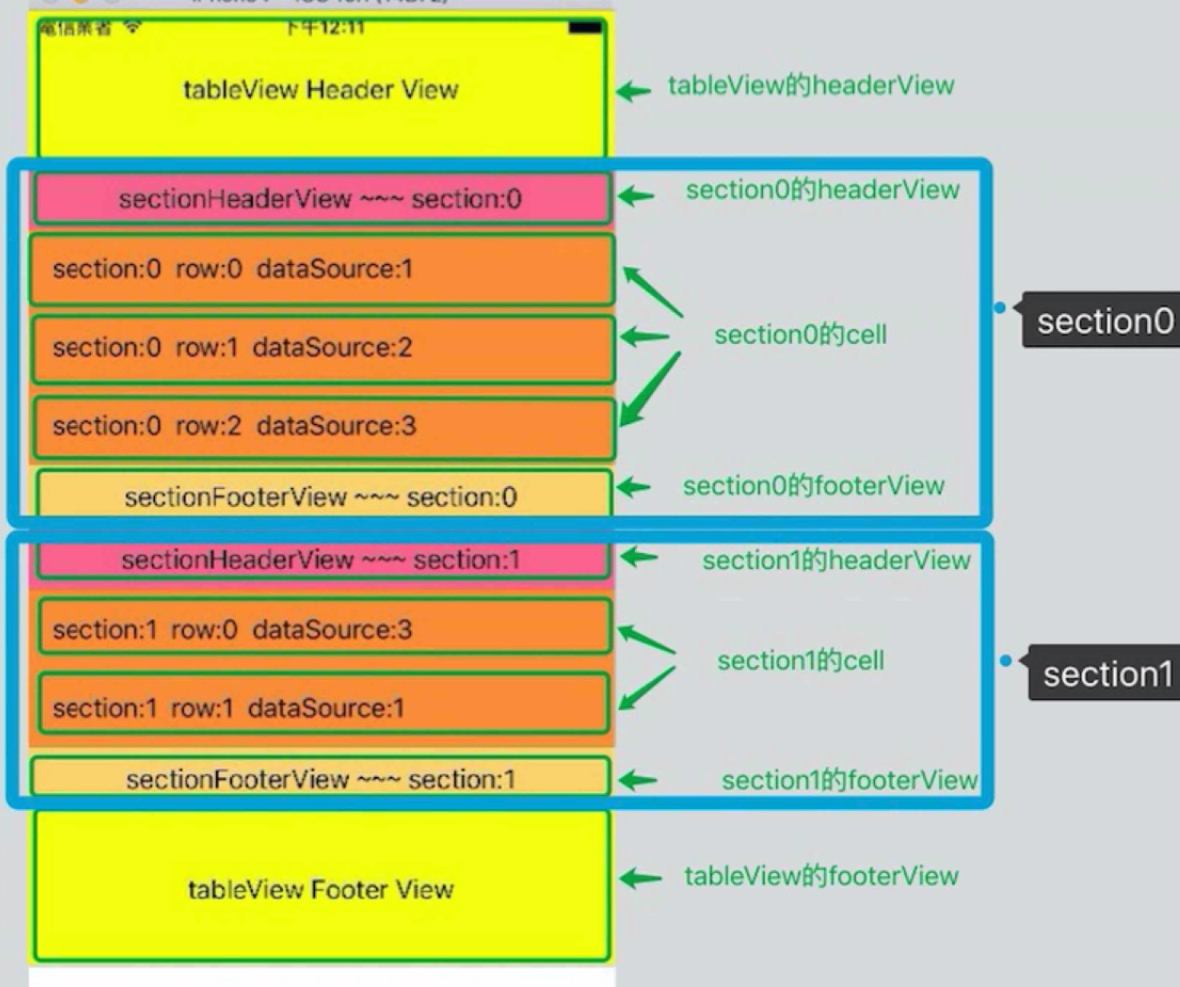
@endTableView
Structure
Function
Delete Row
UI & Implementation
- (BOOL)tableView:(UITableView *)tableView canEditRowAtIndexPath:(NSIndexPath *)indexPath {
return YES;
}
- (void)tableView:(UITableView *)tableView commitEditingStyle:(UITableViewCellEditingStyle)editingStyle forRowAtIndexPath:(NSIndexPath *)indexPath {
[self.data removeObjectAtIndex:indexPath.row];

[self.tableView deleteRowsAtIndexPaths:@[indexPath] withRowAnimation:UITableViewRowAnimationFade];
}
- (NSString *)tableView:(UITableView *)tableView titleForDeleteConfirmationButtonForRowAtIndexPath:(NSIndexPath *)indexPath {
return @"改变";
}
Insert Row
UI
implementation
-(void) addNew:(UIButton *) button {
[self.tableView setEditing:YES];
}
- (UITableViewCellEditingStyle)tableView:(UITableView *)tableView editingStyleForRowAtIndexPath:(NSIndexPath *)indexPath {
return UITableViewCellEditingStyleInsert;
}
- (BOOL)tableView:(UITableView *)tableView canEditRowAtIndexPath:(NSIndexPath *)indexPath {
return YES;
}
- (void)tableView:(UITableView *)tableView commitEditingStyle:(UITableViewCellEditingStyle)editingStyle forRowAtIndexPath:(NSIndexPath *)indexPath {
if (editingStyle == UITableViewCellEditingStyleDelete) {
    [self.data removeObjectAtIndex:indexPath.row];

    [self.tableView deleteRowsAtIndexPaths:@[indexPath] withRowAnimation:UITableViewRowAnimationFade];
} else if (editingStyle == UITableViewCellEditingStyleInsert) {
    [self.data insertObject:@"iPhone" atIndex:indexPath.row];

    //[self.tableView reloadData];
    [self.tableView insertRowsAtIndexPaths:@[indexPath] withRowAnimation:UITableViewRowAnimationFade];
}

}
Move Row
UI & Implementation
- (BOOL)tableView:(UITableView *)tableView canMoveRowAtIndexPath:(NSIndexPath *)indexPath {
return YES;
}


- (void)tableView:(UITableView *)tableView moveRowAtIndexPath:(NSIndexPath *)sourceIndexPath toIndexPath:(NSIndexPath *)destinationIndexPath {
NSString *temp = self.data[sourceIndexPath.row];
[self.data removeObjectAtIndex:sourceIndexPath.row];

[self.data insertObject:temp atIndex:destinationIndexPath.row];
}
Index design
Methods
- (NSArray<NSString *> *)sectionIndexTitlesForTableView:(UITableView *)tableView {
return self.sectionTitles;
}

- (NSInteger)tableView:(UITableView *)tableView sectionForSectionIndexTitle:(NSString *)title atIndex:(NSInteger)index {
NSLog(@"%d = %@", index, title);

return index;

}
self design UITableViewCell
static UITabelView
Refreshing
1.
UIRefreshControl *control = [[UIRefreshControl alloc] init];
control.attributedTitle = [[NSAttributedString alloc] initWithString:@"refreshing..."];
control.tintColor = [UIColor redColor];

[control addTarget:self action:@selector(refreshTableView) forControlEvents:UIControlEventValueChanged];

self.tableView.refreshControl = control;
2.
-(void) refreshTableView {
dispatch_after(dispatch_time(DISPATCH_TIME_NOW, (int64_t)(2*NSEC_PER_SEC)), dispatch_get_main_queue(), ^{
    [self.data insertObject:@"123" atIndex:0];

    [self.tableView reloadData];
    if ([self.tableView.refreshControl isRefreshing])
        [self.tableView.refreshControl endRefreshing];
});
}
CollectionView
self-design collectionViewCell
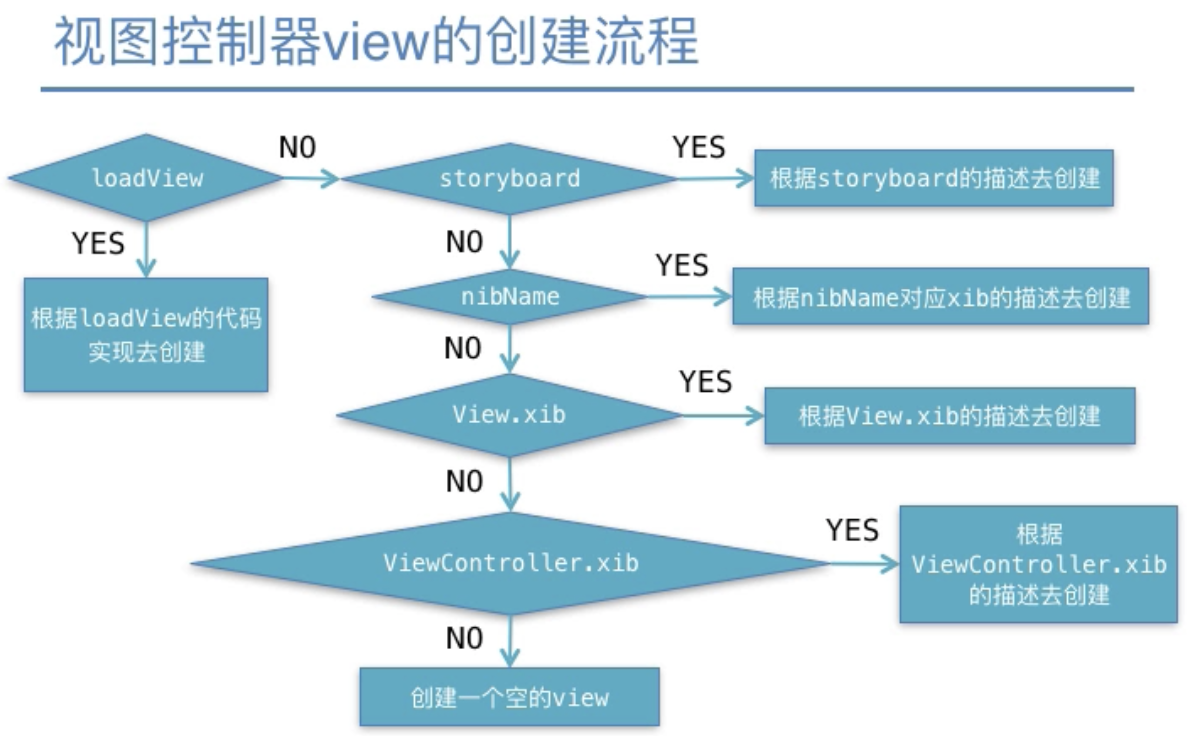
ViewController
launch
process